| Table of Contents |
|---|
Create a SSO
logon procedureLogon Procedure
- Login to the DualShield management consoleAdministration Console
- In the main menu, select navigate to “Authentication | Logon Procedure”Procedures”
- Click the “Create” button on the toolbar
- Enter a suitable “Name” and select “Web SSO” as the Type:


- Click “Save” to create.
- Click the Context Menu context "..." menu icon of the newly create logon procedure, created Logon Procedure, then select “Logon Steps”
- In the popup windows, click the “Create” button on the toolbar
- Select the desired authentication methods, e.g. “Static Password”
- Click “Save”
- Repeat step Step 7 - 9 to add more logon steps if desired, e.g. , as required, for example “One-Time Password”.

- Click "Close" to confirm
Create a SAML application
- In the main menu, select navigate to “Authentication | Applications”
- Click the “Create” button on the toolbar
- Enter a suitable “Name”
- Select the internal “Realm”
- Select the logon procedure that was just created

Logon Procedure created in the previous step.
- Click “SAVE” to createClick “Save”
- Click the context "..." menu of the newly created applicationApplication, select “Agent”“Agents”


- Select “ SSO Server”“Single Sign-on Server"
- Click “Save”“SAVE” to confirm.
- Click the context "..." menu of the newly created applicationApplication, finally select “Self Test” to confirm associations.

Download IdP Certificate
- Navigate to "SSO | SSO Servers"
- Click the context "..." menu icon of the SSO server and , then select “Download IdP Certificate”

The Certificate CRT file will be saved to the local computer.
- Save the certificate file into your hard disk
Download IdP Metadata
- Click the context "..." menu icon of the SSO server and select , then select "Download IdP Metadata"
 &net
&net
Save the file into your hard disk The Metadata XML file will be saved to the local computer.
Import IdP Metadata
Log into in to your Juniper SA Management Console.
- Select “Configuration” in the “System”section
- Select the “SAML” tab
Click “New Metadata Provider”
Enter Name
- Select "Local"
- Click "Choose File" to select the IdP Metadata file downloaded & save in the previous step
Select "Accept Unsigned Metadata"
- Click "Choose File" to select the IdP Certificate file downloaded & save in the previous step
- Select "Identity Provider"

Create a SAML Authentication Server
- Click “Authentication Servers” in the “Authentication” section
- Select “SAML Server” in the dropdown list, and click “New Server”

- Populate the fields


- Click “Save Changes”
We need to make some changes to the newly created SAML server. Change the “Configuration Mode” to “Manual”

- Append "?DASApplicationName=[Application Name]" to the end of "Identity Provider Single Sign On Service URL"

Where [Application Name] is the name of the application that you created in DualShield for the Juniper SA. Append "?DASApplicationName=[Application Name]" to the end of "Single Logout Service URL"

Click "Save Changes"
Download & Import SP Metadata
In the Juniper SA management console, open the newly created SAML authentication server.
Click “Download Metadata”

Save it to your hard disk
Open the file in a text editor
Copy the entire content to the clipboard
In Back in the DualShield management consoleAdministration Console, select “SSO | SSO Servers”. In the context menu of the SSO server, select “Service Providers”Service Providers"
- Click "Create+ CREATE" on the toolbar

- Select the "Single Sign-on Server".
- From the drop-down, choose the SSO Application previously created
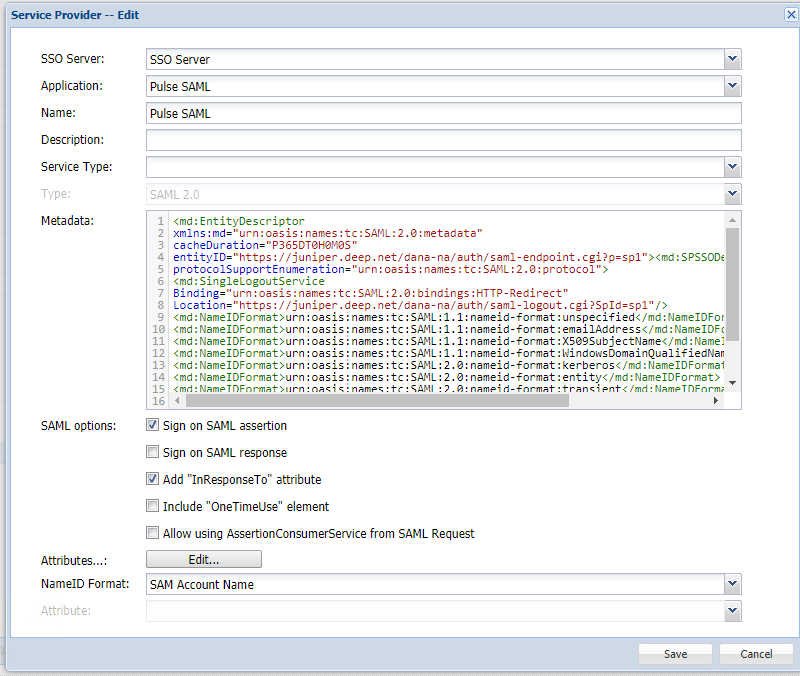
- Enter an appropriate name for this new SSO Server, the SSO Application, and a name to identify the Service provider.
- Set 'Type' to "SAML 2.0" Paste
- the contents of the metadata file you had save to clip board inside the Metadata dialogue boxSelect the "CREATE METADATA" button, when a large textbox will appear. Paste in the Juniper Metadata saved to Clipboard. Then "SAVE" to update.
- Click "Save" to complete creation of this Service Provider