...
| Section |
|---|
|
| Column |
|---|
Authentication> Applications |
| Column |
|---|
|
| Panel |
|---|
| borderColor | #9EBEE5 |
|---|
| bgColor | #f0f0f0 |
|---|
| borderWidth | 1px |
|---|
|  Image Removed Image Removed Image Added Image Added
|
|
|
Click on  on the top right.
...
| Section |
|---|
|
| Column |
|---|
In the new Application window, please enter the following information: | Option | Value |
|---|
| Name: | Enter a friendly name | | Realm: | Select your Realm | | Logon Procedure: | Select the Logon Procedure you had created in the previous step |
Click: Save |
| Column |
|---|
|
| Panel |
|---|
| borderColor | #9EBEE5 |
|---|
| bgColor | #f0f0f0 |
|---|
| borderWidth | 1px |
|---|
|  Image Removed Image Removed Image Added Image Added
|
|
|
Bind the Application to an SSO Server Agent
...
| Section |
|---|
|
| Column |
|---|
Select the drop down menu corresponding to the Application you will be using and click on Agents. |
| Column |
|---|
|
| Panel |
|---|
| borderColor | #9EBEE5 |
|---|
| bgColor | #f0f0f0 |
|---|
| borderWidth | 1px |
|---|
|  Image Removed Image Removed Image Added Image Added
|
|
|
| Section |
|---|
|
| Column |
|---|
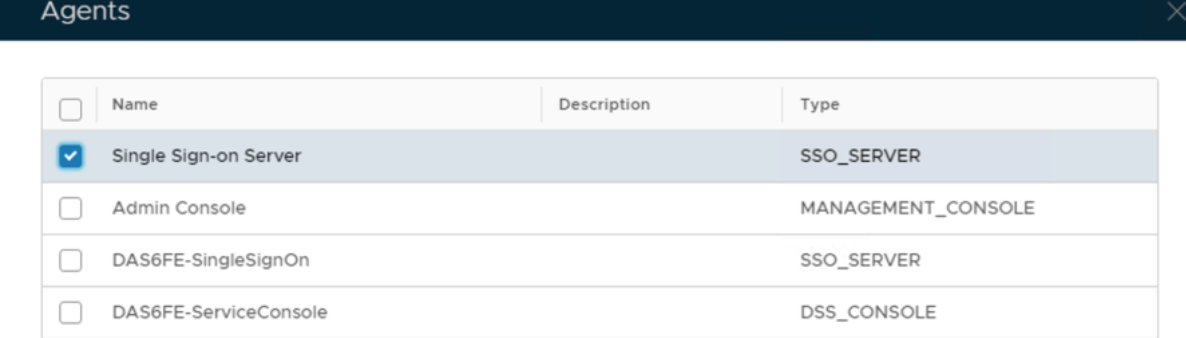
Tick the box of the SSO Server you will be using and click Save below. |
| Column |
|---|
|
| Panel |
|---|
| borderColor | #9EBEE5 |
|---|
| bgColor | #f0f0f0 |
|---|
| borderWidth | 1px |
|---|
| 
|
|
|
...
| Section |
|---|
|
| Column |
|---|
Go to SSO>Service Providers |
| Column |
|---|
|
| Panel |
|---|
| borderColor | #9EBEE5 |
|---|
| bgColor | #f0f0f0 |
|---|
| borderWidth | 1px |
|---|
|  Image Removed Image Removed Image Added Image Added
|
|
|
Click on on the top right.
...
| Section |
|---|
|
| Column |
|---|
Fill in the details as per screenshot on right and make sure you select SAML 2.0(Without Metadata) as Type. |
| Column |
|---|
|
| Panel |
|---|
| borderColor | #9EBEE5 |
|---|
| bgColor | #f0f0f0 |
|---|
| borderWidth | 1px |
|---|
|  Image Removed Image Removed Image Added Image Added
|
|
|
| Section |
|---|
|
| Column |
|---|
Now fill out Entity ID and ACS URL. | Option | Value |
|---|
| Entity ID: | https://prefix.yourdomainname.com | | ACS URL: | https://prefix.yourdomainname.com/SAML20ServicesPortal/SP/ACSsaml |
|
| Column |
|---|
|
| Panel |
|---|
| borderColor | #9EBEE5 |
|---|
| bgColor | #f0f0f0 |
|---|
| borderWidth | 1px |
|---|
|  Image Removed Image Removed Image Added Image Added
|
|
|
| Section |
|---|
|
| Column |
|---|
The completed Service Provider dialogue box will look like this: |
| Column |
|---|
|
| Panel |
|---|
| borderColor | #9EBEE5 |
|---|
| bgColor | #f0f0f0 |
|---|
| borderWidth | 1px |
|---|
|  Image Removed Image Removed
|
|
|
But do not click Save yet.
Create a username attribute.
...
| Column |
|---|
Click on the Attributes tab at the top. |
...
| Panel |
|---|
| borderColor | #9EBEE5 |
|---|
| bgColor | #f0f0f0 |
|---|
| borderWidth | 1px |
|---|
|
 Image Removed Image Removed
|
Click Image Removed
...
...
 Image Added Image Added
|
|
|
At the top of the New Attribute dialogue box please specify the following:
...
...
...
| Panel |
|---|
| borderColor | #9EBEE5 |
|---|
| bgColor | #f0f0f0 |
|---|
| borderWidth | 1px |
|---|
|
 Image Removed Image Removed
|
...
| Column |
|---|
Under Value select the option for Maps to and click on the search icon. |
...
| Panel |
|---|
| borderColor | #9EBEE5 |
|---|
| bgColor | #f0f0f0 |
|---|
| borderWidth | 1px |
|---|
|
 Image Removed Image Removed
|
...
...
Configure as follows:
...
Specify your identity source
...
Click Save.
...
|
| Panel |
|---|
| borderColor | #9EBEE5 |
|---|
| bgColor | #f0f0f0 |
|---|
| borderWidth | 1px |
|---|
|
 Image Removed Image Removed
|
| Section |
|---|
|
| Column |
|---|
Go back to General Settings tab at the top |
| Column |
|---|
|
| Panel |
|---|
| borderColor | #9EBEE5 |
|---|
| bgColor | #f0f0f0 |
|---|
| borderWidth | 1px |
|---|
|
 Image Removed Image Removed
|
| Section |
|---|
| | Column |
|---|
Specify username to the Attribute field. Click Save. |
| Column |
|---|
|
| Panel |
|---|
| borderColor | #9EBEE5 |
|---|
| bgColor | #f0f0f0 |
|---|
| borderWidth | 1px |
|---|
|
 Image Removed
 |
|
Download the IDP Metadata file.
...