
Download DualShield IdP certificate
- Login into DualShield console, select "SSO".
- Click the SSO Server's context menu, select "Download IdP Certificate".

Upload DualShield IdP certificate
The DualShield IdP certificate that we downloaded in the last step needs to be uploaded onto the Cisco ASA
- Launch Cisco ASDM
- Navigate to "Remote Access VPN | Certificate Management| CA certificate"
- Click "Add", enter "Name" and install the earlier downloaded IdP certificate

Create Cisco SP certificate
In SAML authentication, Cisco ASA is a so-called Service Provider (SP), and it needs a SSL server certificate. You can ask ASA to create a self-signed certificate.
- Launch Cisco ASDM
- Navigate to "Remote Access VPN | Certificate Management| Identity Certificates"
- Click "Add"
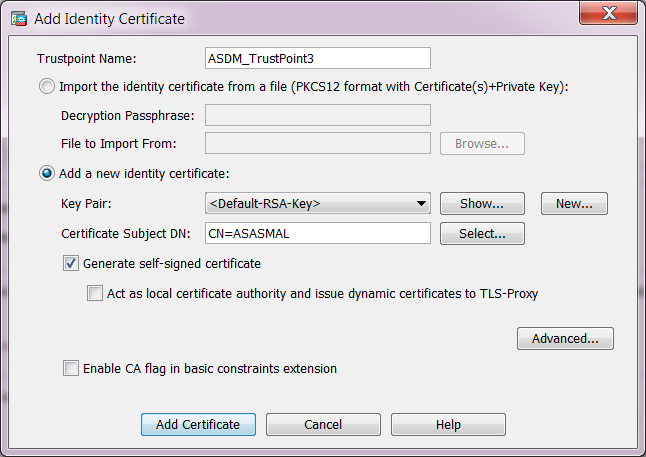
- Select the option: "Add a new identity certificate"
- Tick "Generate self-signed certificate"
- Click "Add Certificate"
Extract DualShield IdP metadata
- Login into DualShield console, select "SSO".
- Click the SSO Server's context menu, select "View".

Make note of "entityID", "Login URL" and "Logout URL" as highlighted above.
Modify "Connection Profiles" in ASA
- Launch Cisco ASDM
- Navigate to "Remote Access VPN | Clientless SSL VPN Access | Connection Profiles"

- Click "Add" in "Connection Profiles" panel

- Enter "Name" , "Aliases"
- In "Authentication – Method", select "SAML"
- Enable "Enable clientless SSL VPN protocol"
- Click the "Manage…" button
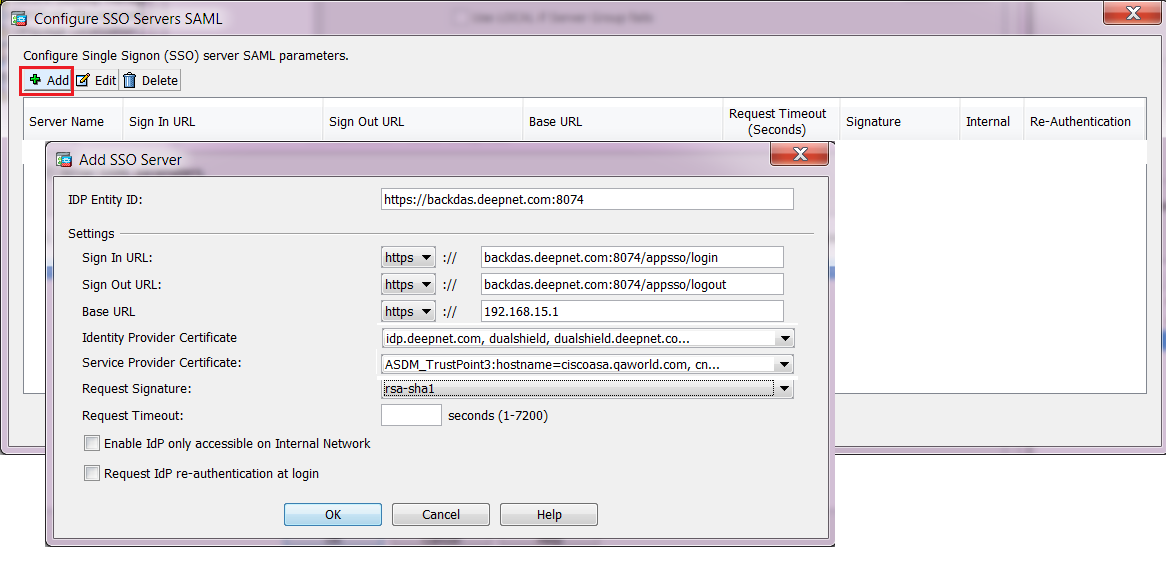
- Click "Add"
- Enter the "IdP Entity ID" , "Sign in URL" & "Sign out URL" which were found in previous steps.
- Select the correct "Identity Provider Certificate"
- Select the correct "Service Provider Certificate"
- Select "rsa-sha1" in "Request Signature" drop down list.
- Click "OK"

- Click "Apply" to save the configuration.
Download Cisco SP metadata
Launch a web browser, navigate to https://[ASA-FQDN]/saml/sp/metadata/[saml vpn connection profile name], i.e. https://192.168.15.1/saml/sp/metadata/samlvpn.

Save the metadata displayed in the browser as a text file, then open the file in a text editor, e.g. notepad

In the URLs highlighted above, replace the “+” letter with the string “%2b”
Save the file.